
If you teach multiple sections of the same course you can use the same assignment but assign it with different due dates and availability dates to different sections.
Canvas
How to set up and use Kami with Canvas
-
Install the Kami for Google Chrome extension here.
 Sign up or log in to Kami:
-
To open Kami, click the extension from your browser, or head straight to kami.app
-
Sign up or log in using your school’s email account, either With Google If signing up, follow the prompts to create a profile and make sure to select Teacher as your role. This gives you the ability to add students to your teacher license.

Connect Kami to your Google Drive
-
In Google Drive, right-click on the file and click Open with, then choose Annotate with Kami.
-
If Kami’s not there, select Connect More Apps to search “Kami” to connect.

?Note: If connecting Kami with Google Drive for the first time, Google will ask you for a list of permissions. This step is essential to allow seamless connection with Kami and Google apps.
How to add students to your teacher license
The easiest way to add students to your license is to create a Kami assignment with Canvas.
Watch the quick tutorial below on how to get started:
After you add students to your license, teach them how to get started, open, and submit their first Kami assignment using this Guide for Students
Canvas Tip #5- Adjust the Assignments Default Due Time
This is a nice update that just came out on April 16. We can now modify the Default Due Time Field for assignments from the current and hitherto unchangeable 11:59 pm. It’s been a bit tedious to always adjust the due time, and I forget about once every three weeks to change the default due time. Currently, since the due date is 11:59 pm, students can tell me that they thought it was due that evening instead of before class. Perhaps you’ve heard that to?
Here’s how I changed my default due time from 11:59 pm to 8:00 am. (BTW, if you like the step by step tool below, it is called IORAD and it is a Google Chrome Extension.)
Here’s an interactive tutorial
** Best experienced in Full Screen (click the icon in the top right corner before you begin) **
Canvas Tip #4- The Redirect Tool
 One of my favorite Canvas “hacks” is using the Redirect Tool app to add features to my course menu. The Redirect Tool can be found under settings > apps. It’s a curving blue arrow as seen on the right and it allows you to add any webpage to your navigation menu.
(the picture below is from Yale’s tech help site) Click the picture to see detailed step-by-step directions on how to configure the tool. The FCIT team is also available to help you set this up.

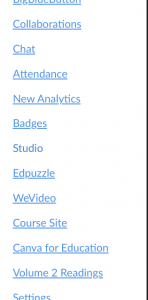
I have used this tool to add links to older course websites before I migrated all my material to Canvas. These days, I use it to link to the history reading packet. I’ve also used it to post a “suggestion box” which allows students to give me feedback on the course via a link to a Google Form. Below is a screenshot of how I have used the tool this year.
Here’s a video showing how to do it.
Canvas Tip #3: Clean the Dashboard.
I am enrolled in and have published a lot of Canvas Courses. I’m in 14 of them and they’re still active, but I need not see them all the time. To clean up my dashboard, I customized the course cards that are displayed upon login. From the dashboard menu on the left, I click on “courses” then “all courses.”
Try it. You’ll see a small star icon next to your courses. Get rid of the star next to courses you don’t want on your dashboard. Suddenly, you have a much cleaner front-page interface to work with. Here’s how. Click “Start” below.
Here’s an interactive tutorial
** Best experienced in Full Screen (click the icon in the top right corner before you begin) **